Apple Mail - Could not connect to this POP/IMAP server.

Error: Could not connect to this POP/IMAP server. Check your network connection and that you entered the correct information in the Account preferences.
This error typically appears when the incoming (POP/IMAP) server information entered into Mail is incorrect. In very rare cases it could also be the remote server is having problems also. Be sure to obtain the correct server settings from your ISPs / mail providers support site.
To verify and / or correct your server settings in Mail, take the following steps:
- Click on the Mail menu at the top left of the screen and select Preferences
- When the Preferences window appears, ensure the Accounts tab is selected.
- If you have more than one account in Mail, select the account from the left column that Connection Doctor displayed the error for from the list on the left of the window.
- Under the Account Information tab on the right, locate the Incoming Mail Server box halfway down the page.
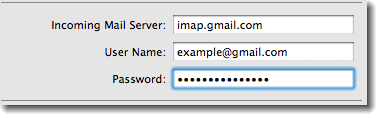
- Verify the Incoming server address is correct. If it is not, enter the correct one in the box. Close the window or select another tab/account to be prompted to save your changes.
- Re-test checking for mail and if the settings are correct there should be no problem.

Error: Could not connect to this POP/IMAP server. Check your network connection and that you entered the correct information in the Account preferences. Also verify that the server supports SSL. If it does not, deselect the "Use SSL" checkbox in the Advanced tab of Account preferences.
In most cases this error is simply a result of the Secure Sockets Layer or SSL checkbox being checked / not checked when it should be the opposite.
- Click on the Mail menu at the top left of the screen and select Preferences
- When the Preferences window appears, ensure the Accounts tab is selected.
- If you have more than one account in Mail, select the account from the left column that Connection Doctor displayed the error for from the list on the left of the window.
- Under the Advanced tab on the right, locate the Use SSL check box halfway down the page.
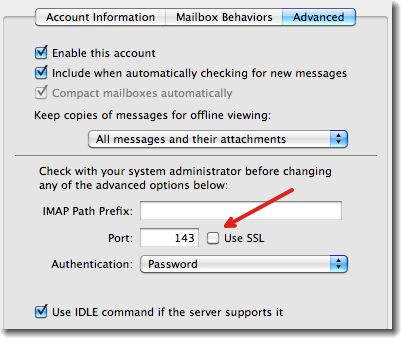
- Verify the Incoming server port number is correct (IMAP: 143 without SSL, 993 with SSL; POP3: 110 without SSL, 995 with SSL). If it is not, enter the correct one in the box. If your email provider does use SSL, ensure the Use SSL check box is checked.
- Close the window or select another tab/account to be prompted to save your changes.
- Re-test checking for mail and if the settings are correct there should be no problem.